Tuesday

Clubhouse Time Capsules, Leap into March!

With all of the excitement of Seuss Week here at the Clubhouse, we definitely didn't want Leap Year to get lost in the shuffle. After all, this is a day that only comes once every 4 years! Armed with a long list of activities that incorporate both leaping and rhyming (you can integrate Dr. Seuss into everything!) I still felt like there was something more I wanted to do with the Clubhouse Kids, and with my own son. So I headed to the internet in search of ideas and stumbled across one that was definitely what I had been missing.

A Leap Year Time Capsule!!

The post that inspired me was written by Are We There Yet Mom? Rebecca, and I found it on Quirky Momma, Kids Activities Blog. You can find it here. She lists a variety of  activities for leap year. I could just leave it at that, her blog covers a lot, but I wanted to share a few ideas specific for those of us who are celebrating, and commemorating, with Preschoolers. 

Start by explaining to your little ones what a Leap Year is! Of course, you could attempt to simplify the Wikipedia definition all on your own... or you could just let them watch a cute little video that does it for you. I love this one.


I must admit, those Veggies sure did clear things up for me on this one. 

Now that they have a better idea of why we have an extra day, let's make that extra day one to remember! This activity is as simple as you want it to be, so let me just tell you how we're going to do it.

We will start with a questionnaire. Do this with just your little one, or as a family. Ask simple questions, and write down all of their answers... verbatim. Capturing exactly where your child is at this point in time is the idea! Here's a look at the questionnaire I whipped up this morning, with some comments/ tips in bold.

**Leap Year 2012**

Name:___________________________________________

How old are you today, February 29th, 2012?_______________

How old will you be on February 29th, 2016?________________
(Bonus Math Lesson right there!)

**Favorites**
Color:

Movie:    
Friend:

Animal:        
Book:

Sport:          
Toy:

Food:
Song:

Beverage:                       

**Measurements**
Weight on February 29, 2012:
  
Height on February 29, 2012:
  -You can also measure them using a string, cutting it to their exact height. Add the string, with a note, to the time capsule. That provides a visual way for them to see how tall they are/ were.
How much do you think you will weigh on February 29, 2016?
-These answers are going to be hilarious, that's the best part.

How tall do you think you will be on February 29, 2016?
 -These answers are going to be even more hilarious in 4 years, 
maybe that's the best part.


**Handprint**
-We did painted hand prints today for all the Clubhouse Kids,
(with washable paint of course)... but you can also go the less messy route and just trace their hands on the paper. 


**Write your name**
-Even if they write their special "scribble" letters, just let it be.
The point is simply to tell them to write their name, 
and let them do it all on their own.

**Footprint**
-We did painted footprints today too, but again... you can trace if you want to avoid extra scrubbing at bath time.


Shoe Size: 
Oh how this will change :)

Self Portrait:
-Tell them to draw a picture of themselves. In 4 years, when you do this again, there self portrait will have changed dramatically. 
This is a great way to mark your child's development, 
and a nice addition to your scrapbooks!

You can stop there, or keep going with anymore specific questions you may want to ask your child. Also, let your child ask you a few questions and document those questions, and your answers, as well.

For Teachers, send the questionnaire home with the kids, along with their footprints and hand prints. It's a great activity for them to continue at home with their families.
Yes, I laminated them.

For Parents, once you have a completed questionnaire, you can then add anything else you want to your time capsule. 

Here's a list of, as of now, what we will be adding:

  • Family photos.
  • Photos of our son doing some of his favorite things.
  • The front page of the newspaper from February 29th.
  • A letter from Mommy to Son, in which I plan to share a few things I love about the age he is now, and including some unforgettable quotes of the past few months (like when he yelled, from the other room, "Momma, I think I need the duct tape!") I may also include some more mushy Mommy stuff. I'm sure I'll cry a little as I write it later this evening.
  • A letter from Mommy to Daddy. Since we will be completing this activity as a family, I figure I'll throw something in for the Hubster. I'll spare you the details on that one ;)
  • A letter from Daddy to our Son, that he doesn't know he's writing yet. He'll probably just add a few lines and sign my letter... but hey, that works for us.
  • A letter from Daddy to Mommy... pssshhhh, yeah right. Who am I kidding with that one? :D
  • One of our "family written books"... (you can read about that here, #14.)
  • ANYTHING else we might decide to throw in before we seal it up tight!
We may just walk around the house and see what else shows who we are right now. As long as it fits and we don't need it anytime soon.

Which brings me to this tip: Be sure not to put anything in there your child is going to be crying for in 3 days. If they say they want to put in their favorite teddy, or blanket, just take a picture of the item instead and put that in there. This will help avoid any "I don't want to wait until 2016!!!!" tears sometime next week.

Once you have everything, seal it up tight and hide it away. Once upon a time I would have thought four years is a long time. Becoming a Mother has showed me that these years are simply flying by, and I want to remember them in as many ways as I can.

You don't think I forgot to mention the actual capsule, do you?
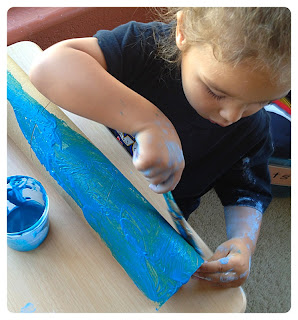
I found something for us to use, and I let our son start painting it today. It's a little large, but it was just too perfect for us so I had to use it. It's as close to an actual capsule as we were going to get.

I still have no idea where I'll put it for the next four years, but when I do find a spot I may share it with all of you so that, if need be, in 4 years you can remind me where I put it.
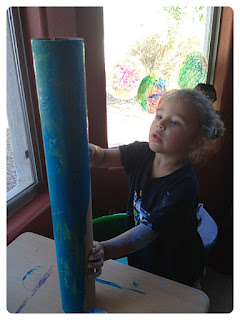


You can use anything for the capsule. A nice sized jar, label removed. A shoebox. Tupperware. Whatever works for your family. These projects are meant to be fun, create memories, and give us something to look forward to as a family. So let's not stress over what to put in, or what to put it in... just do it! 
Tomorrow my son can finish decorating the time capsule. Stickers, glitter, whatever he decides. The one thing I will make sure we don't forget is the sign that goes on it after it has been sealed:


Grab a shoe box and have some fun,

Ms. Liz

Monday

Clubhouse Readers, 15 Tips on Encouraging Reading in your Preschooler


"The more that you read, the more things you will know.
The more that you learn, the more places you'll go."
-Dr. Seuss


Friday

Clubhouse Lava Lamp

Today the Fit Kids Clubhouse Classroom was closed, or so I thought. Before I was even done with my coffee my Son, who had me all to himself today, asked...

"Can we do a Science Experiment in the Classroom?"

How can I turn down a request like that?

Sure I wanted to prepare for the blog I was planning to write about reading with your preschooler. I had a few pictures to take, notes to make. I wanted to prepare for Dr. Seuss week, and plan everything so I'm not be rushing around at the last minute looking for the healthiest ways to color eggs green. I planned to go to the library, stop at the store, and get in a playground visit.

Instead, I decided to let my Son write the lesson plan today.

Asking him what he would like to experiment with he thought for a moment,
(he literally taps his little finger to the side of his lip when he's "thinking") and said...

"Lava."

Well that was easy. Want to make a Volcano, or a Lava Lamp?

More finger tapping...

"Lava Lamp!!!"

This is one we hadn't done yet, and I was just as excited as he was. I have read a few different ways to do this. Some using Salt instead of fizzy tablets. Some using more water, less oil. Like most experiments, ingredients always vary. We went with more oil, simply because he wanted to pour out of the "pretty bottles" in the kitchen.

Oil
Water
Food Coloring
Cut up Alka Seltzer tablets  
A nice long bottle to put it all in

We were ready.

He got right to work, first pouring the oil into the bottle. We decided to fill the bottle up with oil up to the line on the bottle. There was no official measuring involved, I just thought that looked about right.

Then he added the water. Again, no measuring. Just until we thought it had enough. Hey, it's an experiment, right?

As he was pouring the water, bubbles started to form and rise up to the top. He was already excited about what was happening and we hadn't even gotten to the color part yet!

First we added Red, because...

"Red is the color of Lava."

I can honestly say at this point I just got to sit back and watch him experiment.

I think I'll let you do the same.

Adding the red food coloring.

After dropping in an Alka Seltzer tab, he was clearly impressed.

Adding some blue food coloring to the mix, to see if he could make purple bubbles.
Dropping in another fizzy tab, and watching the colors bubble and merge.
Since we hadn't put the lid on the bottle yet, he could hear the fizzing sound coming from the bottle. He put his ear up close and just listened.
Then he wanted a birds eye view before I put the lid on. 
He was so excited about the bubbles he could see right at the surface that I had to take a look for myself.
We put the lid on and then he asked for a marker. Apparently he wanted to play connect the dots.
Realizing the dots moved everywhere and connecting them might take awhile, he decided to turn the bottle on the side and see how the bubbles reacted. 
This, of course, led to turning the bottle upside down. He wanted to see if he could stand the bottle upside down and watch the bubbles "float backwards". I was about to say that the bottle wouldn't balance on that small top. That it was too heavy, that it would tip. Instead I just watched, and... well see for yourself:
He did it!!!
I didn't say a word, and he did it!! 
He balanced the bottle upside down and could watch the bubbles "float backwards". Lesson learned, for me. A lesson I have learned over and over again. Sometimes sitting back and saying nothing is the best way to teach them.
Or wait, would that be them teaching us?
Does it matter? Look at that face. He felt accomplished.
I didn't accomplish a thing on my morning to-do list,
but that no longer mattered.
HE FELT ACCOMPLISHED.

The experiment continued as he decided to take his new lava lamp outside and see if it looked different in the Sun. I tell ya, this kid is good at a lesson plan. I should hire him ;)

Notice the squirt bottle? He asked me to fill it with water so he could squirt the lava lamp and see how the bubbles looked when the bottle was wet.

Then he carefully put the bottle in different locations to see if it looked any differently. 

That's when it happened.

"MOM!!!! LOOK!!! There's A RED BUBBLE left!!"

I don't know if you can even see it in the picture. I wish I was next to you and I could point it out. It's a tiny little red bubble, close to the line at the top. He was so excited to have found this surviving red bubble he closely watched the bottle, as he twisted and turned it, to try and find some more...

and he did.
Can you see them this time?

In the neck of the bottle. A few red bubbles that were apparently "too strong to mix with the blue!!"

You have got to love that kind of focus. When this kid said he wanted to do a Science Experiment this morning he was not kidding!


The lava lamp eventually made it's way back into the classroom, 
and this is what it looked like after being left alone for a little while.

Which of course meant he had to drop another fizzy tab in and do it all over again.


I must admit, I was thoroughly impressed at his ability to carry on this experiment without me. I was just observing as he decided what he thought he should explore next. I let him lead, and we ended up enjoying an activity for almost the entire morning. 

I share this with you, not because I think you want to see 22 pictures of my Son and his lava lamp, but because I want you to see how simple it can to be to keep a Preschooler focused on a task. 

How awesome it can be to watch their faces light up as they try something new. 

How sometimes cancelling your plans for the morning when they have a different plan in mind, can be a good thing. 

A wonderful thing.

I hope you don't mind me sharing my thoughts, instead of just sharing the ingredients that go into a lava lamp. 

Sometimes thoughts are meant to be shared, and looking for 4 red bubbles in a Sea of blue, is a pretty enlightening way to start your day.

I will have to go to the library tomorrow. Tomorrow I will also write the blog I was going to write tonight, all about engaging your Preschooler in reading. As for next week's lesson plans, I think I'm going to consult with my Son and see what he thinks we should do :)

I'm.. in.. a.. Lava Lamp,
(Come on, am I the only one who hears that song lyric when I hear the words lava lamp? I blame my College days... forgive me... carry on.)

Ms. Liz 


Thursday

Clubhouse Paint, Decaf Please

Since deciding that we were going to introduce a new paint recipe to the Clubhouse Classroom every week, we have had fun with our minty "gum" painting (Epsom Salt Paint), and our "just add muscle" painting (Corn Syrup Paint). Today we introduced a scented paint into the classroom that all the kids recognize.

"THAT'S COFFEE!!" 

I would imagine that most Preschoolers are familiar with that smell after waking Mom up at 5:00am on Saturday, again. Or is that just my house?

Moving on...

All we needed was a few pouches of instant coffee, some cups of warm water, and paintbrushes to mix it all up. I chose flavored coffee, so that we could enjoy the different scents. No one in this classroom was going to enjoy the flavor, especially since I don't drink instant coffee.

I let the kids dump the pouches into the small jars of warm water and start mixing it all up.


Immediately we could smell Vanilla and Hazelnut coffee. I know I have said it before, but I will say it again, I absolutely love activities that engage multiple senses. Give the kids something that they can smell, and it is suddenly a much more engaging activity. 


I prefer the nicer smells, like the baby oil scented Cloud Dough in the sensory table, but the kids also learn from the stinky smells. Remember the "teeth" in Vinegar effect? 

Either way, today was a good smell day. 

Now, here's the part where I made magic.

When no one was looking I wrote the children's names on their white papers, in white crayon. As they were painting they started to see letters in their artwork. As we put the letters together, they realized they could see their names!!

"This is MAGIC!!!"

Don't you just love being able to make magic happen? 

This is the age you get to do that, over and over and over again.. enjoy it ;)

On all of the white pages at the table I had written the letters of their names. I also had familiar words, M O M, D A D, etc. The purpose was not only to have a page with their name on it, but to also cut letters out once the paintings were dry. Then we have letters to use to make words.

So they painted and painted and painted, and watched the letters appear. It was a great way to discuss the letters in their name, which letters come first, which are capital and lowercase, and what words they could make. They were having so much fun making letters appear they didn't realize they were learning letters at the same time. That is the best kind of learning isn't it?

Now it was time to take this coffee adventure outdoors. 
Hmmm, so what should we paint on with coffee? 
That was easy to answer...


First they colored the coffee filters with markers to make nice bright colors.

Once we had them all colored, 
it was time to add some coffee...
and more coffee.
Yes, they pretty much saturated them with coffee.
Good thing that's what coffee filters are for.
It was a bright Sunny day today, I knew they would dry up fast...
but it happened so fast that a light breeze carried the filters away.
Time for a little exercise as we ran and caught our flyaway art,
and moved it inside to finish drying with the rest.
(Bonus physical activity!!)

In no time at all we had letters to make names,
and new window hangings for the Clubhouse classroom.

Who knew decaf could go such a long way?

The Mommy in me has already hung the Coffee Art my Son made, right where I thought it would look perfect.
Next to the coffee mugs :)


Who says Preschoolers shouldn't have Coffee?

Ms. Liz

Tuesday

Clubhouse "Teeth", Part 2

Today was highly anticipated around the Clubhouse. The day we get to see what happened to our Clubhouse "Teeth". (If you missed part one of this experiment, and would like to see how it all began... catch up here.)


I decided we would take this big reveal outside, anticipating that opening jars that have been soaking hard boiled eggs in various substances might have a not so pleasant smell. So outside we went, with jars in hand.

The first jar we opened was the egg soaking in Coca Cola. Immediately the kids noticed that our once white, shiny egg was now brown and spotted.

Tapping the egg, it still had a hard shell, but that shell was no longer what we want our teeth to look like!

"Teeth are not supposed to have brown spots!"

"I can't drink Coca Cola no more or my teeth will turn brown!"

Mission accomplished.

The next jar was probably the one that the kids were most excited about since they noticed that the egg seems to have gotten bigger in there over the past few days, and it started floating!


As soon as we opened this one the observations started rolling in...

"Eww, smells like fart!"

"Why does the egg stink?"

Seeing as how this was an experiment in dental health and brushing our teeth, I took this opportunity to discuss how when we don't brush our teeth and we let all of the "mouth germs" (a name they chose for the bacteria in our mouths) build up in there we end up getting very smelly breath. (Bonus lesson!)

Then we freed the egg so we could test for hardness and observe color. Looks like a pretty little Easter egg, doesn't it? Well don't let looks deceive you, this egg had the most drastic change of all of our eggs.

It had no shell left.

"This is totally mushy!!"

"I can squish it like play dough!"

"I don't want my teeth to be yellow and mushy!" (Loving how they continued to draw conclusions between the eggs and their teeth, never losing sight of the purpose of our experiment.)


On to the Orange Juice egg. We opened it up, and everyone took a whiff.

"Smells like Orange Juice!"

Yes, it did. No bad breath lesson in this jar.

They did immediately notice little hard spots on the egg though.


It was the same yellow color as the  egg that was in the Vinegar mixture, but this egg still had a shell.

"This one is still hard, but not that hard!"

"This has icky stuff stuck all over it!"

Even after rubbing the egg, the "stuff" didn't come off. I'm not sure what this reaction really is and I haven't started a Google hunt on it yet because I heard all I needed to hear when a child exclaimed,

"This must be cavities on the egg!!"

Like I said at the beginning of this experiment, which is right here if you missed it, this is Preschool. We get to draw relationships between icky stuff on an egg and cavities. In the end, we have kids who want to brush their teeth. Who learned, in a very hands on and exciting way, that if you don't brush your teeth they will turn yellow, become soft and your breath will smell. If you drink a lot of Coca Cola, your teeth will get brown and spotted. If you drink a lot of juice, you get cavities. Those are all pretty accurate, and valuable, lessons learned.
So I say the Clubhouse "Teeth" experiment was a huge success!!

My consensus on the experiment was validated later at lunch, listening to their conversations.

"My teeth are strong enough to chew this apple. If I don't brush them they will turn mushy!!"

"I don't want soft teeth, then how will I eat my sandwich?"

"Mouth germs make your breath stink."

"Yeah, your breath will smell like cat poop."
(This is when I lost my appetite.)


Eggcited about brushing our teeth,
(I teach Preschool, I earn the right to use cheesy lines like that one :)

Ms. Liz

Follow our Clubhouse Adventures:

Photobucket Photobucket Photobucket Follow Me on Pinterest